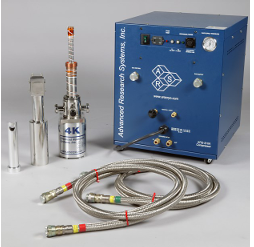
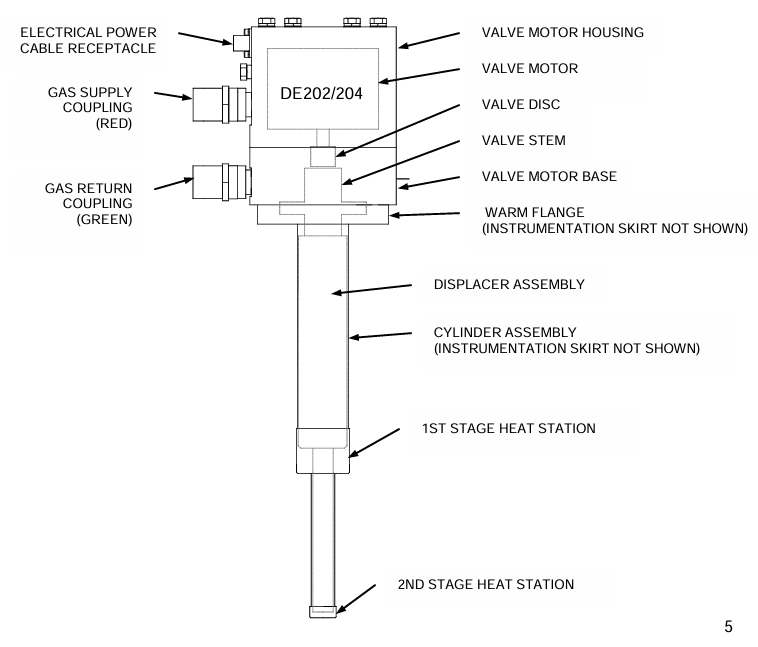
The ARS cryostat is a closed cycle cryogenic refrigerator consists of a water-cooled compressor, that compresses helium gas, and an expander, that gets cold. The expander uses the Gifford-McMahon refrigeration cycle. The expander has two helium gas line connections, one is high pressure and the other is low pressure. There are three electrical ports A,B, annd C. Ports A and B are used by the temperature controller. Port C is used for electrical measurements. There is an KF flange used to pump a vacuum around the cold head.
The crystat and magnet were set up in this configuration by Peter Luidolt and his documentation of this system can be found in his master thesis.
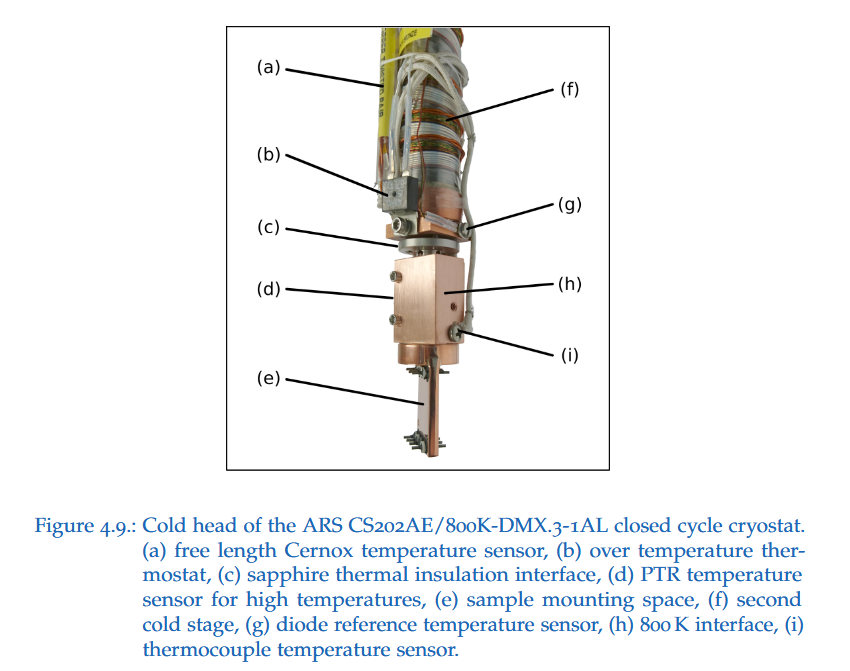
Sensor A
Type: LakeShore DT-670B-SD diode temperature sensor.
Range: From 1.4 K to 500 K.
Position: Reference sensor mounted at the second cold stage 4.9(f)
above the thermal insulation interface 4.9(c).
Remark: High magnetic field-induced error. Sensor A calibration
Sensor C
Type: LakeShore PT-103 platinum resistance sensor.
Range: From 30 K to 800 K.
Position: Mounted on the side of the heating stage 4.9(d).
Remark: Used for better accuracy at high temperatures. The PT-
103 package is a special non-magnetic variant of a PT-100 temperature sensor. Sensor C calibration.
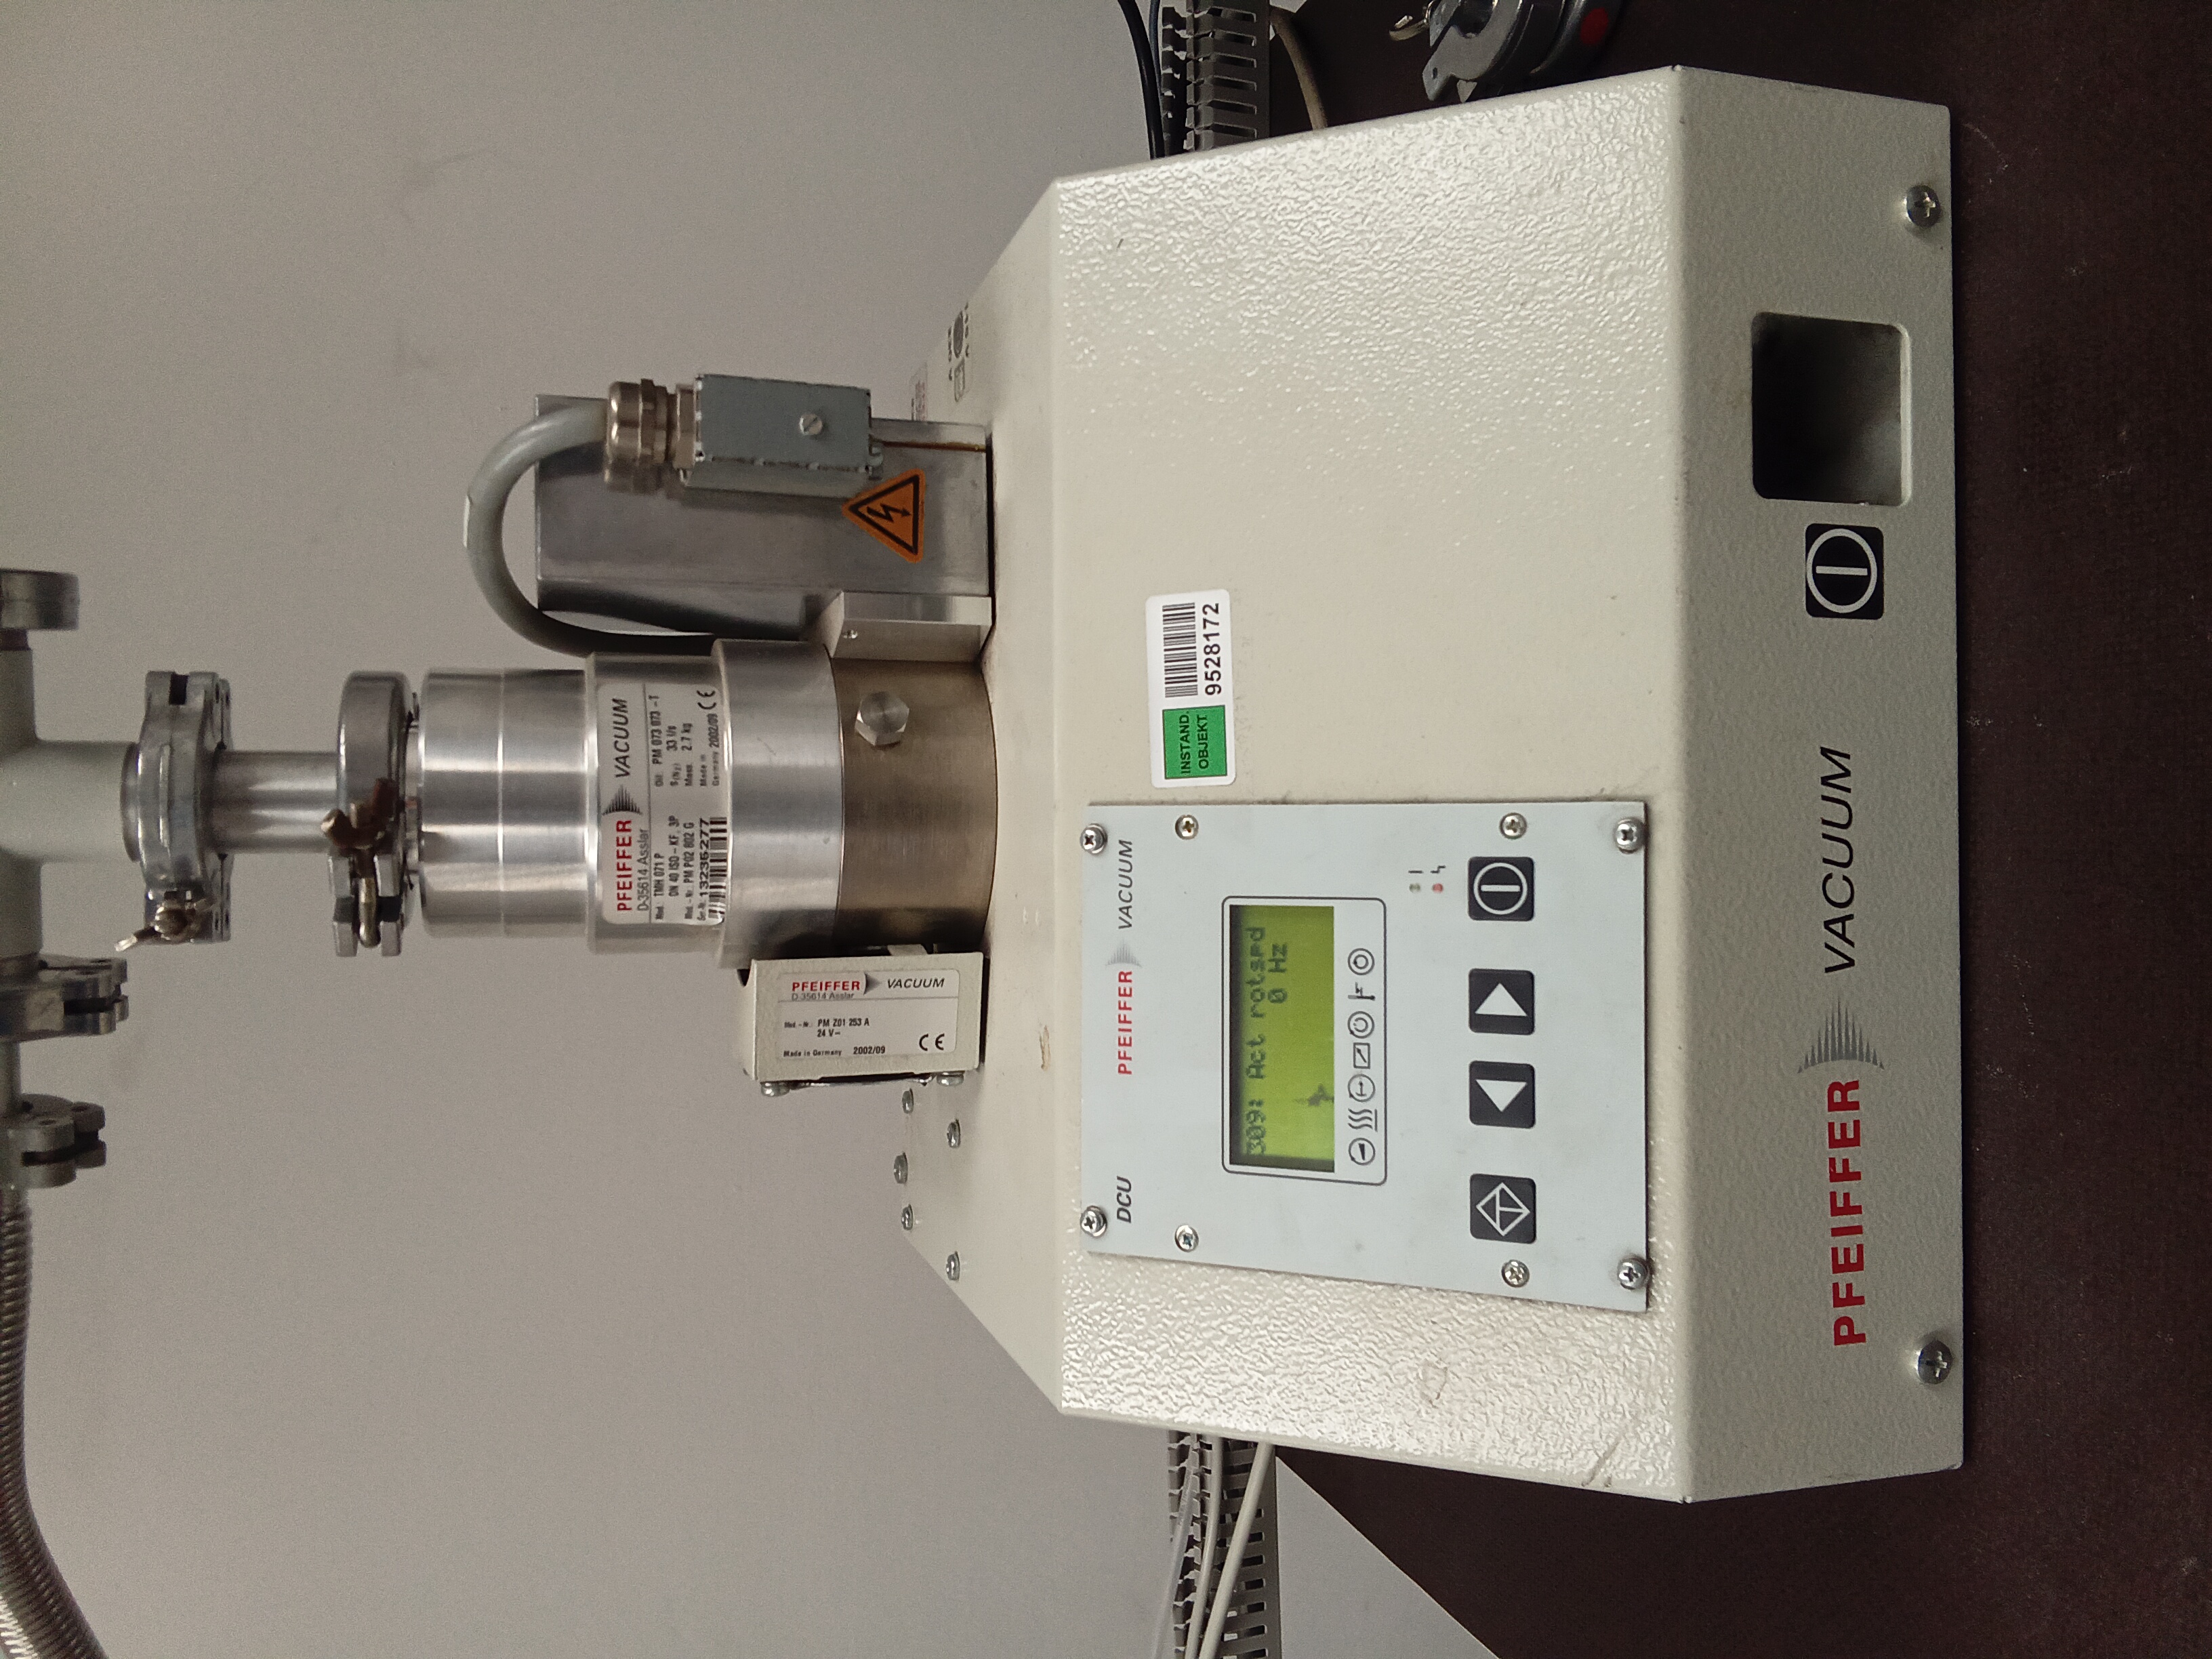
Pfeiffer Vacuum TSH 071 E Turbomolecular Drag Pumping Station
The Pfeiffer Vacuum TSH 071 E is a completely self-contained vacuum pumping station. It uses a diaphragm pump as a pre vacuum pump for a turbomolecular pump and is therefore completely oil free. A Pfeiffer Compact Full Range Gauge is used to measure the current pressure inside the vacuum system.
In the magnet laboratory, the vacuum system is used to thermally insulate the cold head of the cryostat with a high vacuum in the order of magnitude of E-4 mbar when starting the cooling process to E-6 mbar after sufficient time and at low temperatures.
There is a switch on the back for the membrane pump and a switch on the front inside the cutout in the lower right corner. Once these switches have been turned on, the controller boots and this takes a minute. There is a black vent knob on the back of the turbomolecular pump. Make sure this is closed before tuning on the pump. After the controller is ready, press the power button on the controller.
Operating instructions
How to cool down:
Inspect the cold head of the cryostat and ensure yourself that the radiation shield and the vacuum shroud are closed.
Open the cooling water drainage valve and then the cooling water inlet valve.
Verify that the vacuum valve at the cold head of the cryostat is open (as shown in figure VacuumSystemValve), this valve should never be closed.
Turn on the Pfeiffer Vacuum Single Gauge with the switch on the back side of the gauge.
Close the venting screw on the backside of the vacuum pump head (right handed screw thread) until it is firmly closed.
Turn on the Pfeiffer Vacuum Turbomolecular Drag Pumping Station TSH 071 E. There is a green switch for the membrane pump on the back of pump station. The main switch is recessed in an opening at the lower right front side of the pumping station. Wait a few seconds for the system to boot.
Press the Key Right on the Display And Operating Unit DCU 001 until you are at "309: Act rotspd" to display the rotational speed of the turbomolecular pump. (The set rotspd at 308 should be at 1500 Hz.)
Start the vacuum pumps with the Key Pumping Station ON/OFF on the DCU 001. The diaphragm pump will start instantaneously and when the pressure is low enough the turbomolecular pump will slowly start to work. The rotary speed can be observed at the display and will rise to 1500 Hz as the pressure drops.
Wait for the pressure to reach a value on the order of magnitude of E-4 mbar on the pressure gauge. This takes about 11 minutes. (If this takes significantly longer, stop the turbomolecular pump with an ON/OFF button. Wait for the “actrot” to reach 0 Hz. Open the vacuum release valve on the back, wait for the atmospheric pressure to come back. Check if the vacuum shroud is properly sealed, rotate it a couple of times to make sure the O-rings are in place and greased properly. Try again by going back to step 5.)
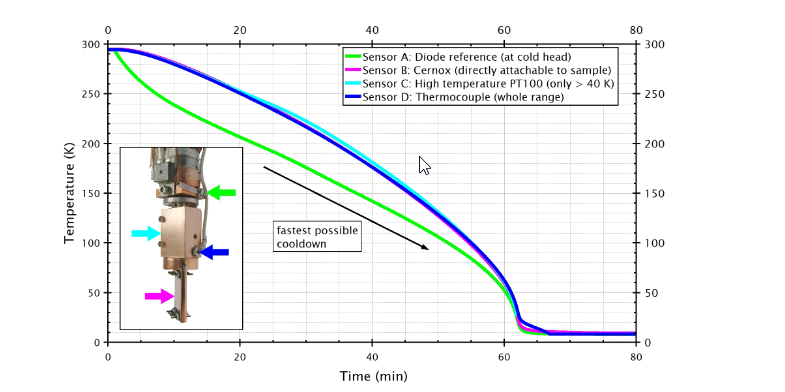
Now you can engage the ON switch of the ARS-4HW Compressor to start the cooling process. It takes about an hour to reach the lowest temperatures.
How to warm up:
Shutdown the cooling by turning off the ARS-4HW compressor.
If the cooling water is not needed anymore (i.e. the compressor and the magnet are not in use), you can close the water inlet valve and the water drainage valve.
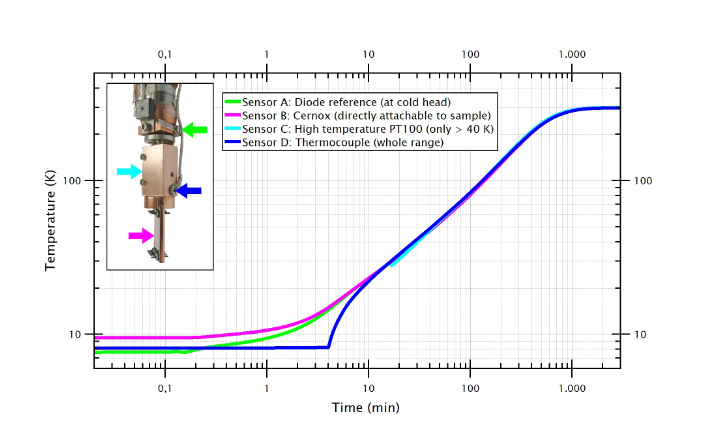
Wait for the cryostat to warm up.
The temperature inside the cryostat needs to be at least higher than the freezing point of water before the cryostat can be vented. Wait until the temperature is room temperature ~ 290 K before venting. It will take a long time for the cryostat to warm up by itself. You can use this slow warming to take temperature dependent measurements.
You can speed up the process by turning on a heater. Press "SETPOINT" on the Lakeshore 336 → Input 300 Kelvin → press "ENTER" → Press "Heater Range" → Press the up-arrow button until it says "High" on the bottom of the screen → Press "ENTER" → verify the "Heat" shows 100%